Version: 1.1.4
React Native
All function details are mentioned detaily in mobile section. This section includes platform specific codes.
1. Importing WebView#
Import the WebView component from react-native-webview
import { WebView } from 'react-native-webview';
class DemoPulpoAr extends Component {
render(){
return (
<WebView
source={{ uri: url }} //takes url
injectedJavaScript= {initialCommand} // takes javascript command when the page loaded
ref={(ref) => (this.webview = ref)} // webview reference
/>
2. Building Webview#
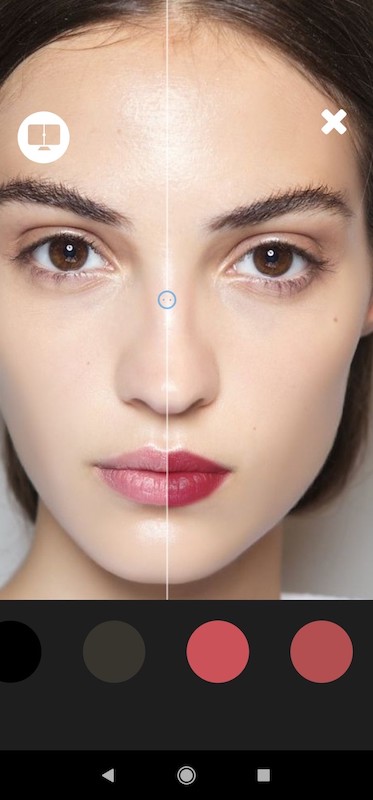
You can see very simple usage of our plugin. Webview is center of page and color buttons below. When web page is loaded init function runs with website_id parameters. Without these information plugin does not works
// javascript code after webview loaded
const initialCommand =
`
origin = origin = 'http://127.0.0.1:8000';
initProducts('af648582-1346-45e0-bea2-f872c7a84c6d', origin);
activeProduct = {"********"}
set_active_products(JSON.stringify(activeProduct))
`;
const url = 'https://devphotomakeup.pulpoar.com/' // website url
class DemoPulpoAr extends Component {
render(){
return (
<View>
<View
style={{
flexDirection: "column",
flex: 1,
justifyContent: 'space-between'
}}>
<View
style={{
flexDirection: "column",
flex: 0.8,
justifyContent: 'space-between'
}}>
<WebView
source={{ uri: url }} //takes url
injectedJavaScript= {initialCommand} // takes javascript command when the page loaded
ref={(ref) => (this.webview = ref)} // webview reference
/>
</View>
)
}
}
export default DemoPulpoAr;
- You can use product code
activeProduct = {"code": "********"}
set_active_products_by_code(JSON.stringify(activeProduct));
3. Apply Products#
There is two option to apply any product. You can use product code or product name that consist of brand name, product name and color name.
Apply Product With Code
// applyProduct with product uid
this.webview.injectJavaScript("applyProductWithCode('********')")
Optional Model Class Designed For Demo App
// model class
class Product {
constructor(name, category, hexCode, color,uid) {
this.name = name;
this.category = category;
this.hexCode = hexCode;
this.color = color;
this.uid = uid
}
}
And Our Color Buttons With Products
const p1 = new Product("Pulpoar Lipstick 01", "Lipstick","l01", "#8d2152", "product_code");
const p2 = new Product("Pulpoar Lipstick 02", "Lipstick","l02", "#A4585E", "product_code");
const p3 = new Product("Pulpoar Lipstick 3","Lipstick","l03","#7f081d","product_code");
const p4 = new Product("Pulpoar Blusher 01","Blusher","b01","#f27a51","product_code");
const p5 = new Product("Pulpoar Eyeliner 01","Eyeliner","e01", "#000000", "product_code");
const p6 = new Product("Pulpoar Foundation 01", "Foundation", "f01", "#DFBBA1", "product_code");
<TouchableHighlight // we add action to apply product
onPress = {()=>{
// applyProduct with product name
// productname = brandname + " " + "product name" + "color_name";
// applyProduct with uid
this.webview.injectJavaScript("applyProductWithCode('*******')")
}}
>
<View
style ={{
margin : 20,
padding : 30,
borderRadius : 40,
backgroundColor: products[0].color
}}
>
</View>
</TouchableHighlight>
Sample App With Source Code :
//
// Copyright (c) PulpoAR
// PhotoMakeUp React Native Demo Project
//
import React, { Component } from 'react';
import { View, ScrollView,TouchableHighlight } from 'react-native';
import { WebView } from 'react-native-webview';
// model class
class Product {
constructor(name, category, hexCode, color,uid) {
this.name = name;
this.category = category;
this.hexCode = hexCode;
this.color = color;
this.uid = uid
}
}
const p1 = new Product("Pulpoar Lipstick 01", "Lipstick","l01", "#8d2152", "product_code");
const p2 = new Product("Pulpoar Lipstick 02", "Lipstick","l02", "#A4585E", "product_code");
const p3 = new Product("Pulpoar Lipstick 3","Lipstick","l03","#7f081d","product_code");
const p4 = new Product("Pulpoar Blusher 01","Blusher","b01","#f27a51","product_code");
const p5 = new Product("Pulpoar Eyeliner 01","Eyeliner","e01", "#000000", "product_code");
const p6 = new Product("Pulpoar Foundation 01", "Foundation", "f01", "#DFBBA1", "product_code");
// javascript code after webview loaded
const initializeCommand =
`
origin = origin = 'http://127.0.0.1:8000';
initProducts('WRITE_YOUR_WEBSITE_UID', origin);
activeProduct = {"********"}
set_active_products(JSON.stringify(activeProduct))
`;
const url = 'https://devphotomakeup.pulpoar.com/' // website url
// product array
let products = [
p1,p2,p3,p4,p5,p6,
];
class DemoPulpoAr extends Component {
render(){
return (
<View
style={{
flexDirection: "column",
flex: 1,
justifyContent: 'space-between'
}}>
<View
style={{
flexDirection: "column",
flex: 0.8,
justifyContent: 'space-between'
}}>
<WebView
source={{ uri: url }} //takes url
injectedJavaScript= {initializeCommand} // takes javascript command when the page loaded
ref={(ref) => (this.webview = ref)} // webview reference
/>
</View>
<View
style = {{
flexDirection: "row",
flex: 0.2,
justifyContent: 'space-around',
}}>
<ScrollView
horizontal ={true}
>
<TouchableHighlight // we add action to apply product
onPress = {()=>{
// applyProduct with product name
// this.webview.injectJavaScript("applyProduct('Lipstick','Pulpoar Lipstick 01')")
// applyProduct with uid
this.webview.injectJavaScript("applyProductWithCode('********')")
}}
>
<View
style ={{
margin : 20,
padding : 30,
borderRadius : 40,
backgroundColor: products[0].color
}}
>
</View>
</TouchableHighlight>
<TouchableHighlight
onPress = {()=>{
// applyProduct with product name
// this.webview.injectJavaScript("applyProduct('Lipstick','Pulpoar Lipstick 02')")
// applyProduct with uid
this.webview.injectJavaScript("applyProductWithCode('********')")
}}
>
<View
style ={{
margin : 20,
padding : 30,
borderRadius : 40,
backgroundColor: products[1].color
}}
>
</View>
</TouchableHighlight>
<TouchableHighlight
onPress = {()=>{
// applyProduct with uid
this.webview.injectJavaScript("applyProductWithCode('********')")
}}
>
<View
style ={{
margin : 20,
padding : 30,
borderRadius : 40,
backgroundColor: products[2].color
}}
>
</View>
</TouchableHighlight>
<TouchableHighlight
onPress = {()=>{
// applyProduct with uid
this.webview.injectJavaScript("applyProductWithCode('********')")
}}
>
<View
style ={{
margin : 20,
padding : 30,
borderRadius : 40,
backgroundColor: products[3].color
}}
>
</View>
</TouchableHighlight>
<TouchableHighlight
onPress = {()=>{
// applyProduct with uid
this.webview.injectJavaScript("applyProductWithCode('********')")
}}
>
<View
style ={{
margin : 20,
padding : 30,
borderRadius : 40,
backgroundColor: products[4].color
}}
>
</View>
</TouchableHighlight>
<TouchableHighlight
onPress = {()=>{
// applyProduct with uid
this.webview.injectJavaScript("applyProductWithCode('********')")
}}
>
<View
style ={{
margin : 20,
padding : 30,
borderRadius : 40,
backgroundColor: products[5].color
}}
>
</View>
</TouchableHighlight>
</ScrollView>
</View>
</View>
);
}
}
export default DemoPulpoAr;
caution
Provide camera permission to capture photo
Result:
You can request sample project from here).