//
// Copyright (c) PulpoAR
// PhotoMakeUp Flutter Demo Project
//
import 'package:flutter_inappwebview/flutter_inappwebview.dart';
import 'package:flutter/material.dart';
import 'package:DemoPulpoAr/product.dart';
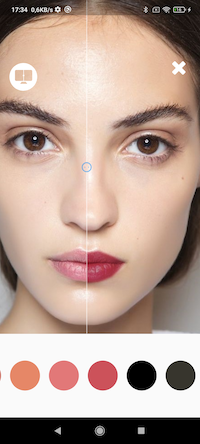
Product p1 = new Product("Pulpoar Lipstick 01", "Lipstick","l01", "#8d2152", "product_code");
Product p2 = new Product("Pulpoar Lipstick 02", "Lipstick","l02", "#A4585E", "product_code");
Product p3 = new Product("Pulpoar Lipstick 3","Lipstick","l03","#7f081d","product_code");
Product p4 = new Product("Pulpoar Blusher 01","Blusher","b01","#f27a51","product_code");
Product p5 = new Product("Pulpoar Eyeliner 01","Eyeliner","e01", "#000000", "product_code");
Product p6 = new Product("Pulpoar Foundation 01", "Foundation", "f01", "#DFBBA1", "product_code");
InAppWebViewController inAppWebViewController; // webview controller reference
String url = 'https://devphotomakeup.pulpoar.com'; //website url
//Javascript command will compile after website loaded
String cmd = """
origin = 'http://127.0.0.1:8000';
initProducts('af648582-1346-45e0-bea2-f872c7a84c6d', origin);
activeProduct = {"Lipstick": "Pulpoar Lipstick 01", "makeupType":["Lipstick"], "makeupMode":0}
set_active_products(JSON.stringify(activeProduct))
""";
class DemoPulpoAR extends StatefulWidget {
@override
_DemoPulpoARState createState() => _DemoPulpoARState();
}
class _DemoPulpoARState extends State<DemoPulpoAR> {
@override
Widget build(BuildContext context) {
List<Product> productList = new List<Product>(); // list of products
List<Color> colorList = new List<Color>();
productList.add(p1);
productList.add(p2);
productList.add(p3);
productList.add(p4);
productList.add(p5);
productList.add(p6);
return Scaffold(
body: Container(
child: Column(
children: [
_makeUIView(context), // -> webview
_makeUIColors(context, productList), // -> color buttons
],
),
),
);
}
_makeUIView(BuildContext context) {
return Container(
height: MediaQuery.of(context).size.height * 0.8,
child: InAppWebView(
initialUrl: url, // takes url
onWebViewCreated: (InAppWebViewController controller) {
inAppWebViewController = controller;
},
onLoadStop: (InAppWebViewController controller, String url) {
setState(() {
evaluateJS(cmd); // this command should be execute after load ends
});
},
));
}
void evaluateJS(String command) {
inAppWebViewController.evaluateJavascript(source: command);
}
void goBack() {
// webview commands can be added
inAppWebViewController.goBack();
}
_makeUIColors(BuildContext context, List<Product> list) {
return Container(
height: MediaQuery.of(context).size.height * 0.2,
width: MediaQuery.of(context).size.width,
child: ListView.builder(
scrollDirection: Axis.horizontal,
itemCount: list.length,
itemBuilder: (context, index) {
var colorList = List<int>.generate(list.length, (colorIndex) => colorIndex = int.parse("0xFF${list[index].color.substring(1)}"));
return GestureDetector(
// add action to apply products
onTap: () {
// applyProduct with product name
// productname = brandname + " " + "product name" + "color_name";
// applyProduct('Blusher','Flormar BAKED BLUSH-ON 044 PINK BRONZE')
// evaluateJS(
// """
// applyProduct('${list[index].category}','${list[index].name}')
// """
// );
// applyProduct with product uid
evaluateJS("applyProductWithCode('${list[index].uid}')");
},
child: Container(
alignment: Alignment.bottomCenter,
height: MediaQuery.of(context).size.width * 0.15,
width: MediaQuery.of(context).size.width * 0.15,
margin: EdgeInsets.all(8),
decoration:
BoxDecoration(shape: BoxShape.circle, color: Color(colorList[index])),
),
);
},
),
);
}
}